Creating a CLI tool with Node.js – LogRocket Blog
I am a fullstack developer passionate about learning something new every day, then sharing my knowledge with the community.
Nội Dung Chính
What is a CLI tool?
CLI tools allow you to run certain tasks or operations right from your terminal or command line prompt. They can be built using different programming languages, and one way to create a CLI tool is by using Node.js.
In this article, you’ll learn how to create a CLI tool using Node.js, test it, and then publish it on npm.
We’ll create a tool called todos-cli that allows the user to view their to-do list, add items to it, then check those items off.
You can find the entire code for this tutorial on this GitHub Repository.
Setting up the project
First, create a directory that will hold the CLI tool:
mkdir todos-cli
cd todos-cli
Next, we will initialize our Node.js project:
npm init
You will be asked to enter a few pieces of information. You can skip this if you want to by passing the -y argument to the command:
npm init -y
This will set the information to its defaults. Once that is done, we need to install some packages that will help create our CLI tool. These are:
- commander: This package makes creating the CLI tool easier. It provides functions that will allow us to set the commands, options, and more
- chalk: This package lets us print colored messages to the console. It will help us make our CLI tool look nice and pretty
- conf: This package allows us to save persistent information on the user’s machine. We will be using it to save the user’s to-do list
To install these packages, run:
npm i commander chalk conf
Once the packages are done installing, we are ready to start the development of the CLI tool.
Creating a CLI tool
Create a file index.js in the root of the project. This will be the main entry of the CLI tool that will initialize the commands it will have.
NOTE: If you are using Windows for development, make sure that the line end character is set to LF instead of CRLF or the tool will not work. Most coding editors have the option to set that. Also, testing on Windows might not work, so I suggest either using another operating system or using Windows Subsystem for Linux (WSL). Your published tool in the end, however, will work on all operating systems with no issues.
To make sure that your CLI tool works correctly, add the following code to the beginning of index.js:
#! /usr/bin/env node
Next, to create a CLI with basic configurations and functionalities, we can use commander. First, let’s require program from commander:
const { program } = require('commander')
To declare a command, we will use the following functions:
program.command: takes a string that defines the format of the commandprogram.description: describes the command for the user. This is helpful when the user executes our tool with the option--helpprogram.option: the options that this command can take, if anyprogram.action: the action that this command performs, which will be a function
We will use these functions to declare our commands. But what are our commands for this CLI tool?
We need the following commands:
todos list: this will list the tasks in the user’s to-do listtodos add: this will add a new task to the user’s to-do listtodos mark-done: this will mark specific tasks or all tasks asdonein the list
Setting up List Command
The list command will just show the list of tasks that the user has added before. It will not take any options. The user should be able to run it just by running the following command in their terminal:
todos list
In index.js, add the following below the code we added earlier:
program
    .command('list')
    .description('List all the TODO tasks')
    .action(list)
As you can see, we are using the command function to declare the command in our CLI tool. The argument you pass is a string that shows the format of the command expected. We are also using the description function to describe this command to the user when they run our tool with the --help option. Finally, we are assigning the action to a function called list, which we will create shortly.
Keeping our commands in separate files helps make our code readable and easily maintainable.
Now, create the file commands/list.js. This file will hold the function that will run whenever the user runs to-dos list in their terminal. This function will just retrieve the list of tasks from the configuration and display them.
For storing and retreiving the tasks, we will be using the conf package. It has the following functions:
set: this sets the information we need under a specific keyget: this gets the information we set before under a specific key
So, let’s start by requiring and instantiating conf in commands/list.js:
const conf = new (require('conf'))()
Next, we need to implement the list function, which we will export for use in index.js:
function list () {

}
The list function does not take any arguments, as the list command does not have any options or arguments.
Inside the list function, we will just retreive the data under the key todo-list which will be an array and display each of the TODO tasks. todo-list will be an array of objects of the following format:
{
  text, //string, the text of the todo task
  done, //boolean, whether the todo task is marked done or not
}
Now that we know what the structure of our data will be like, let’s go back to the list function. The first thing we need to do is retreive the list of to-do list tasks:
const todoList = conf.get('todo-list')
Next, if the user has tasks in their to-do list, we will loop over them and display the ones done in green and the ones that are still not done in yellow. We will also inform the user of what each color means in the beginning using a blue color.
If the user does not have any tasks in their to-do list, we will show them a message in red indicating that they don’t have any tasks in their to-do list.
As we mentioned before, we will use chalk to color our messages to the user in the terminal. So, let’s require it after conf in the beginning of commands/list.js:
const conf = new (require('conf'))()
const chalk = require('chalk')

//rest of our code
Then, inside the list function, let’s add our if conditions as we mentioned:
const todoList = conf.get('todo-list')

if (todoList && todoList.length) {
  //user has tasks in todoList
} else {
  //user does not have tasks in todoList
}
Let’s work on the else part first. We need to display a message that tells the user they don’t have any tasks in their to-do list. We need to display it in red using chalk:
else {
  //user does not have tasks in todoList
  console.log(
    chalk.red.bold('You don\'t have any tasks yet.')
  )
}
As you can see from the code, we can output messages in different colors with chalk using chalk.COLOR and you can make it bold by using chalk.COLOR.bold. COLOR can be red, blue, yellow, green, etc.
Part of the use case of the list function is done. The next part would be to show the tasks when the user does have tasks. First, we will show the user a message that details the color meaning of the tasks:
if (todoList && todoList.length) {
        console.log(
            chalk.blue.bold('Tasks in green are done. Tasks in yellow are still not done.')
        )
}
Here, we are displaying it in bold blue.
Next, we will loop over todoList, and for each task, check if it’s done and, if so, display it in green. If not, display it in yellow:
todoList.forEach((task, index) => {
            if (task.done) {
                console.log(
                    chalk.greenBright(`${index}. ${task.text}`)
                )
            } else {
                console.log(
                    chalk.yellowBright(`${index}. ${task.text}`)
                )
            }
        })
Our list function is done! Finally, to be able to use it in index.js, let’s export the function:
module.exports = list
The full code for command/list.js should be:
const conf = new (require('conf'))()
const chalk = require('chalk')
function list () {
    const todoList = conf.get('todo-list')
    if (todoList && todoList.length) {
        console.log(
            chalk.blue.bold('Tasks in green are done. Tasks in yellow are still not done.')
        )
        todoList.forEach((task, index) => {
            if (task.done) {
                console.log(
                    chalk.greenBright(`${index}. ${task.text}`)
                )
            } else {
                console.log(
                    chalk.yellowBright(`${index}. ${task.text}`)
                )
            }
        })
    } else {
        console.log(
            chalk.red.bold('You don\'t have any tasks yet.')
        )
    }
}
module.exports = list
Let’s go back to index.js. We just need to require list:
const list = require('./commands/list')
Then, add at the end of the file the following:
program.parse()
This is necessary for commander. Once we are done declaring our commands, we parse the input of the user so that commander can figure out which command the user is running and execute it.
Testing the CLI tool
Our CLI is ready to be tested now. The first step of testing is adding the following key in package.json:
"bin": {
    "todos": "./index.js"
}
todos will be used in the terminal when running commands from our todos-cli command. You can change it to whatever you want. We are pointing it at index.js, as this is our main point of entry.
This step is not just important for testing the tool, but also for publishing it later on. So, make sure to add it.
Next, we are going to run the following to install our package globally on our machine:
npm i -g
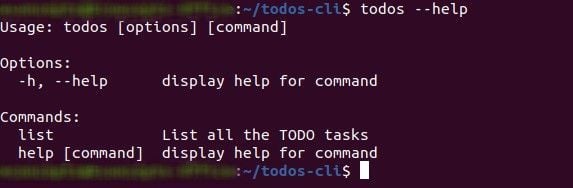
Once that is done, we can now run our tool right from the terminal! Let’s test it out by running:
todos --help
You will see information about our CLI, and you can see that list is under Commands:
Now, let’s try running our list command:
todos list
It will just show us that we don’t have any tasks yet. Let’s now implement a new command that adds tasks.
Add Command
The add command will take one argument, which will be the text of the task. Here’s an example of how the command will look.
todos add "Make Dinner"
“Make Dinner” is the argument that will be the text of the task. We are using quotations because it has a space in it. You can also try escaping the space using \. If the text does not have a space, then quotations are not necessary.
To add a new command, in index.js under the declaration of the list command and before program.parse(), add the following:
program
    .command('add <task>')
    .description('Add a new TODO task')
    .action(add)
As you can see, we passed to the command function add <task> where <task> is the argument the user passes. In commander, when an argument is required, we use <ARG_NAME>, whereas if it’s optional, we use [ARG_NAME]. Also, the name you give the argument is the name of the parameter passed to the function in action.
Now, we need to implement the add function. Like we did for list, let’s create the file commands/add.js with the following content:
const conf = new (require('conf'))()
const chalk = require('chalk')

function add (task) {

}

module.exports = add
Notice that we passed task to the add function, which will be the argument passed by the user.
The add function will take the task and store it in the todos-list array using conf. Then, we will show the user a success message in green using chalk.
We will first retrieve todo-list from conf, then push the new task to the array, then use conf.set to set the new value of todo-list.
Here’s the entire code for the add function:
function add (task) {
    //get the current todo-list
    let todosList = conf.get('todo-list')

    if (!todosList) {
        //default value for todos-list
        todosList = []
    }

    //push the new task to the todos-list
    todosList.push({
        text: task,
        done: false
    })

    //set todos-list in conf
    conf.set('todo-list', todosList)

    //display message to user
    console.log(
        chalk.green.bold('Task has been added successfully!')
    )
}
It’s pretty simple! After creating the list command, things are getting clearer and easier to understand.
Now, we go back to index.js and require the add function we just created:
const add = require('./commands/add')
Let’s test it out. In your terminal, run:
todos add "Make Dinner"
We will get the message, “Task has been added successfully!” in green. To check that the task has actually been added, run in your terminal:
todos list
And you can see the task you just added. Try adding a few tasks to see the list grow.
The last command we will add is the mark-done command which will mark a task as done.
mark-done command
The mark-done command, by default, will mark all tasks as done. However, if we pass it the --tasks option followed by at least one index of the tasks we want to mark as done, it will just mark those as done.
Here’s an example.
todos mark-done --tasks 1 2
For the simplicity of the tutorial, we are using just the indices of tasks to mark them done. In a real-life use case, you would probably assign IDs to the tasks which would be unique and random instead.
Let’s declare our new command below the add command:
program
    .command('mark-done')
    .description('Mark commands done')
    .option('-t, --tasks <tasks...>', 'The tasks to mark done. If not specified, all tasks will be marked done.')
    .action(markDone)
The main difference between this command and the previous commands is the usage of the option function. The first parameter is the format of the option.-t, --tasks means that the user can use either -t or --tasks to pass this option. <tasks...> signifies that it can be more than one task, but because we are using <> that means it should include at least one. The second parameter is the description of the option. This is useful when the user runs todos mark-done --help.
Next, we will create the markDone function. Just like we did before, let’s create the file commands/markDone.js with the following content:
const conf = new (require('conf'))()
const chalk = require('chalk')

function markDone({tasks}) {

}
module.exports = markDone
As you can see, markDone takes an object that includes a tasks property. If the user passes the -t or --tasks option to the command, tasks will be an array of the values the user passes. Else, it will be undefined.
What we need to do inside the markDone function is retrieve the todo-list array from conf. If todo-list is not empty, loop over it. If tasks is an array that holds at least one item, mark only the tasks of the indices the user enters as done. If tasks is undefined, then mark all tasks as done.
This will be the markDone function:
function markDone({tasks}) {
    let todosList = conf.get('todo-list')

    if (todosList) {
        //loop over the todo list tasks
        todosList = todosList.map((task, index) => {
            //check if the user specified the tasks to mark done
            if (tasks) {
                //check if this task is one of the tasks the user specified
                if (tasks.indexOf(index.toString()) !== -1) {
                    //mark only specified tasks by user as done
                    task.done = true
                }
            } else {
                //if the user didn't specify tasks, mark all as done
                task.done = true
            }
            return task
        });

        //set the new todo-list
        conf.set('todo-list', todosList)
    }

    //show the user a message
    console.log(
        chalk.green.bold('Tasks have been marked as done successfully')
    )
}
We are looping over todosList (if it’s not empty) inside map. Then, we check if tasks is defined (which means that the user has passed specific tasks to mark as done).
If tasks is defined, check if the current task item in the iteration is one of the tasks the user specified by checking if the index is in the tasks array. Note that we are using index.toString() because the tasks array will hold the indicies the user enter as strings. If the index is part of the tasks array, mark it as done, else nothing changes.
If, however, tasks is not defined, then, as we mentioned before, we will mark all items as done. Once the loop is done and we have the updated list, we are setting todo-list using conf.set to the new array. In the end, we show the user a success message.
Finally, let’s go back to index.js and require our markDone function:
const markDone = require('./commands/markDone')
Now, we can test it out. Try first marking all tasks done by running:
todos mark-done
If everything is correct, you can run todos list and see that all items are in green now.
Next, try adding a few more tasks then marking those done using their indices, an example of marking a single task as done:
todos mark-done -t 1
Or to mark multiple tasks:
todos mark-done -t 1 3 6
You can try any combinations then check which are marked done and which aren’t using the todos list command.
Our CLI tool is done! todos-cli now allows the user to add tasks, view them, and mark them done.
The next and last step would be to publish your CLI tool.
Publishing the CLI tool
CLI tools built with Node.js are published on NPM as a package. So, you need to create an NPM account if you don’t already have one.
After you create your NPM account, in your terminal in the directory of your project, run the following:
npm login
You will be asked to enter your username, password, and email. If all correct, you will be logged in.
Next, run the following command:
npm publish
This command will publish your CLI tool publicly on npm. You might get an error if another package with the same name exists. If so, you will need to change the name of the package in package.json
"name": "PACKAGE_NAME",
Keep in mind that PACKAGE_NAME is different than the name we use for the CLI commands. PACKAGE_NAME is used for the installation of the tool on your machine, but the name you specify as a key in bin is the one used to access the tool from the terminal.
If no other package on npm has the same name, your package will be public and available for use! To install it, run:
npm i -g <PACKAGE_NAME>
<PACKAGE_NAME> is the name you picked for the package. Note that if you already ran npm i -g in the package during development, it’s probably best to remove it prior to installing your published package using npm remove -g in the tool’s directory.
Updating a CLI tool package
If later on you need to update your CLI tool package, you can do so with the following command:
npm version <UPDATE_TYPE>
<UPDATE_TYPE> can be one of the following:
patch: a small change. This will increment only the last number of the version. This is usually used to fix bugs or make small amends that shouldn’t affect the end user’s usage syntax of your tool or packageminor: a minor change. This will increment the second number of the version. This is usually used for minor changes in your package or tool, maybe adding functionalities but keeping the old ones intactmajor: a major change. This will increment the first number of the version. This is usually used for big changes in your package or tool that could affect the end user’s usage of it
You can go here to read more about versioning.
Conclusion
Congratulations, you learned how to create a CLI tool using Node.js. The possibilities are endless, so go create something awesome!
200’s only  Monitor failed and slow network requests in production
Deploying a Node-based web app or website is the easy part. Making sure your Node instance continues to serve resources to your app is where things get tougher. If you’re interested in ensuring requests to the backend or third party services are successful,  https://logrocket.com/signup/
Deploying a Node-based web app or website is the easy part. Making sure your Node instance continues to serve resources to your app is where things get tougher. If you’re interested in ensuring requests to the backend or third party services are successful, try LogRocket
LogRocket is like a DVR for web and mobile apps, recording literally everything that happens while a user interacts with your app. Instead of guessing why problems happen, you can aggregate and report on problematic network requests to quickly understand the root cause.
LogRocket instruments your app to record baseline performance timings such as page load time, time to first byte, slow network requests, and also logs Redux, NgRx, and Vuex actions/state.
LogRocket instruments your app to record baseline performance timings such as page load time, time to first byte, slow network requests, and also logs Redux, NgRx, and Vuex actions/state. Start monitoring for free
Share this: