Node.js Login System with Express, JWT & MySQL (Rest API)
AdvertisementsIn this article you will learn how to use Node.js, Express, JWT (JSON Web Tokens) and MySQL to create your own Rest API for user authentication – a complete Node.js login system.
This article is the first part of a two-part series to create a complete login system with Node.js and Vue.js. For this we use Node.js as backend and Vue.js as frontend.
The tutorial is divided into two parts so that you are not bound to a Vue.js frontend, but can apply the Rest API we are developing in this article to other frontends like Angular or React as well.Advertisements
This way to part 2: Vue.js Login System with Vuex & Axios
Nội Dung Chính
Our goal: Node.js Login – Rest API with Express, JWT and MySQL
We create a Node.js application that runs on our local server. For this purpose we have a MySQL database where our user data is stored. For authentication we have to query this data and can open a session for the user with the help of the JWT (JSON Web Token) extension.Advertisements
At the end you have an executable application that you can deploy on your own server with the help of this guide. But now we finally want to start! 🙂
Here you can also find the tutorial in video form:
1. What is a Rest API?
A Rest API represents the interface between server and client. Via normal HTTP requests we reach the server and can execute programmed functions such as authenticating a user with the corresponding password.Advertisements
Since this tutorial is not suitable for absolute beginners, I assume that you are already a bit familiar with Node.js, so we’ll skip the installation and get straight to the exciting part. If you are not familiar with Node.js yet, you can take a look at this Node.js beginner tutorial. After that you will have learned all the basics and can start using your Node.js login system.
2. Install dependencies
So our Node.js app is ready to install the dependencies. We need the following modules:
PackageDescriptionexpressWith this we create our own webserver for our Rest API mysqlTo read/write in our databaseuuidTo create IDs for later users bcryptjs (Attention:
not
bcrypt)For encrypting/decrypting passwordsjsonwebtokenTo handle user sessionscorsSo that we can access the Rest API from our website.
We install these modules using the following CLI command:Advertisements
npm install bcryptjs express jsonwebtoken mysql uuid cors
3. Set up MySQL database
For the database I use XAMPP, so I can host my own database locally. Of course you can also use any other (remote) database.
For our login system we only need a table according to the following scheme:

 ER model of the “users” table
In the database, our table then looks like this:
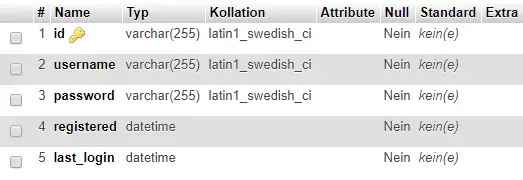 phpMyAdmin View of the “users” table
So that we can also access this connection via our Node.js application, we create our own class file, which we later include in our router.
// lib/db.js

const mysql = require('mysql');

const connection = mysql.createConnection({
	host: 'localhost',
	user: 'node-jwt',
	database: 'node-jwt',
	password: '********'
});

connection.connect();
module.exports = connection;
4. Setting up an Express Router and creating routes
Our entry file is the index.js and contains the starting of our web servers and the integration of the routes we define in the file routes/router.js.
// index.js

const express = require('express');
const app = express();
const cors = require('cors');

// set up port
const PORT = process.env.PORT || 3000;

app.use(express.json());
app.use(cors());

// add routes
const router = require('./routes/router.js');
app.use('/api', router);

// run server
app.listen(PORT, () => console.log(`Server running on port ${PORT}`));
In the router.js we define our routes and then pack the logic into them. The reason why we use an extra file here is the clarity. If your application has 20 or more routes at some point, the index.js will be chaotic. That’s why we outsource our routes.
// routes/router.js

const express = require('express');
const router = express.Router();

const bcrypt = require('bcryptjs');
const uuid = require('uuid');
const jwt = require('jsonwebtoken');

const db = require('../lib/db.js');
const userMiddleware = require('../middleware/users.js');

router.post('/sign-up', (req, res, next) => {});

router.post('/login', (req, res, next) => {});

router.get('/secret-route', (req, res, next) => {
	res.send('This is the secret content. Only logged in users can see that!');
});

module.exports = router;
Here we register the route /api/sign-up for registration and /api/login for login. We also have the route /api/secret-route, which you should only be able to call if you are logged in. Currently every user can access it. More about this later.Advertisements
In line 10 we also include our file for the database connection.
We also include the file ../middleware/users.js, which contains the code to verify the requests. This means that we check if the user has entered a password and the username complies with the guidelines. We later switch these queries as middleware into the call of our routes.
5. Creating Middleware (Validation)
A middleware is a small program, which is switched between two components. In this case, between our request and the actual registration, we have a middleware that validates the entered data. For the registration a validation can look like this:
// middleware/users.js

const jwt = require("jsonwebtoken");

module.exports = {
	validateRegister: (req, res, next) => {
		// username min length 3
		if (!req.body.username || req.body.username.length < 3) {
			return res.status(400).send({
				msg: 'Please enter a username with min. 3 chars'
			});
		}

		// password min 6 chars
		if (!req.body.password || req.body.password.length < 6) {
			return res.status(400).send({
				msg: 'Please enter a password with min. 6 chars'
			});
		}

		// password (repeat) does not match
		if (
			!req.body.password_repeat ||
			req.body.password != req.body.password_repeat
		) {
			return res.status(400).send({
				msg: 'Both passwords must match'
			});
		}

		next();
	}
};
When calling our /sign-up route, our middleware should be executed. To do this, change the marked line as follows:
// routes/router.js

const express = require('express');
const router = express.Router();

const userMiddleware = require('../middleware/users.js');

router.post('sign-up', userMiddleware.validateRegister, (req, res, next) => {});

router.post('login', (req, res, next) => {});

module.exports = router;
6. Register (/sign-up) route (with JWT)
To add a new user to the database, we have to check if the username does not yet exist. If the user exists, an error message is issued. If the user does not yet exist, our module bcrypt is used to hash (encrypt) the entered password and then enter all data into the database.Advertisements
// routes/router.js

router.post('/sign-up', userMiddleware.validateRegister, (req, res, next) => {
  db.query(
    `SELECT * FROM users WHERE LOWER(username) = LOWER(${db.escape(
			req.body.username
		)});`,
    (err, result) => {
      if (result.length) {
        return res.status(409).send({
          msg: 'This username is already in use!'
        });
      } else {
        // username is available
        bcrypt.hash(req.body.password, 10, (err, hash) => {
          if (err) {
            return res.status(500).send({
              msg: err
            });
          } else {
            // has hashed pw => add to database
            db.query(
              `INSERT INTO users (id, username, password, registered) VALUES ('${uuid.v4()}', ${db.escape(
								req.body.username
							)}, ${db.escape(hash)}, now())`,
              (err, result) => {
                if (err) {
                  throw err;
                  return res.status(400).send({
                    msg: err
                  });
                }
                return res.status(201).send({
                  msg: 'Registered!'
                });
              }
            );
          }
        });
      }
    }
  );
});
Important is the function db.escape(), e.g. in line 25. This masks passed parameters to avoid SQL injection. If the entry of the user is successful, the status code 201 (“created”) is returned and the function call is terminated.
Ever heard of Double Opt-In? It involves sending confirmation emails to verify a registration. In this tutorial you will learn how to implement Double Opt-In in your Node.js application (based on this tutorial).
7. Login (/login) route (with JWT)
In addition to the registration process, we have a login route to log in for already registered users. Here you can search for the appropriate database entry by user name. Then the entered password from the database is checked with the help of jwt.compare(). A short SQL query sets the last login date/time in line 44 to the current value.
// routes/router.js

router.post('/login', (req, res, next) => {
  db.query(
    `SELECT * FROM users WHERE username = ${db.escape(req.body.username)};`,
    (err, result) => {
      // user does not exists
      if (err) {
        throw err;
        return res.status(400).send({
          msg: err
        });
      }

      if (!result.length) {
        return res.status(401).send({
          msg: 'Username or password is incorrect!'
        });
      }

      // check password
      bcrypt.compare(
        req.body.password,
        result[0]['password'],
        (bErr, bResult) => {
          // wrong password
          if (bErr) {
            throw bErr;
            return res.status(401).send({
              msg: 'Username or password is incorrect!'
            });
          }

          if (bResult) {
            const token = jwt.sign({
                username: result[0].username,
                userId: result[0].id
              },
              'SECRETKEY', {
                expiresIn: '7d'
              }
            );

            db.query(
              `UPDATE users SET last_login = now() WHERE id = '${result[0].id}'`
            );
            return res.status(200).send({
              msg: 'Logged in!',
              token,
              user: result[0]
            });
          }
          return res.status(401).send({
            msg: 'Username or password is incorrect!'
          });
        }
      );
    }
  );
});
In lines 36 and 37 we pass variables that we want to “store” in the JWT token. This gives us access to these variables in the protected routes.

AdvertisementsIn line 39 you have to pass a key with which the JWT token is generated, this is important for the verification later. Here you can enter any string.
You can also specify in line 40 how long the token should be valid. Values like “1h” or “3m” are valid here. You can also read about the individual values and parameters in the documentation.
If the password is wrong or the username does not exist, an error message is displayed. This message is intentionally identical, as a potential attacker could otherwise obtain information about the existence of individual user profiles.Advertisements
If the login is successful, the user object and the token generated by JWT are returned. This token is important for all routes in which you should be logged in. In part 2 (Vue.js Frontend) you will learn how to pass this token with every request. If you test the Rest API with Postman, you can specify the token with the key “Authorization” as value according to the following syntax: “Bearer KEY”.
 Postman Authorization Header
8. Protect routes with login
The most important routes are now ready. We can add new users and log in with existing accounts. Now we want to protect routes. This means that only registered users have access to them.
Therefore we create a new middleware in our users.js. The token is taken from the header of the request and verified by JWT.
// middleware/users.js

isLoggedIn: (req, res, next) => {
  try {
    const token = req.headers.authorization.split(' ')[1];
    const decoded = jwt.verify(
      token,
      'SECRETKEY'
    );
    req.userData = decoded;
    next();
  } catch (err) {
    return res.status(401).send({
      msg: 'Your session is not valid!'
    });
  }
}
In the marked line you have to enter the same key with which you have already generated the JWT.
To protect a route now, simply include this middleware when calling the route as follows:
// routes/router.js

router.get('/secret-route', userMiddleware.isLoggedIn, (req, res, next) => {
  console.log(req.userData);
  res.send('This is the secret content. Only logged in users can see that!');
});
The req.userData contains the data we have stored in the JWT key (in this case username and userId). This allows us to read user-defined values from the database using the userId for protected routes, for example.
When developing a Rest API, errors can occur – this is completely normal. Often some edge cases are not considered. How you can select these test cases and test them automatically, I have summarized here:
Testing Rest API with Postman
9. Conclusion
➡️ Continue with part 2: Vue.js Login System with Vuex & AxiosAdvertisements
That?s it! In the first part we have now written a complete Rest API for validation and session handling for our application. You can use this system for your frontend (no matter if Angular, React or Vue). Thanks for reading! 🙂


