How to install SQL Server on Mac
If you are looking to work with SQL on a Mac, you will need a database management system. In this post, we are explaining how to install and set up Microsoft SQL Server on your Mac.
Developed by Miscorsoft, SQL Server can be installed on your Mac, but it’s not quite as straightforward as installing it on a Windows machine, so scroll down for our detailed guide to installing SQL Server on macOS.
We will look into installing SQL Server for Mac, connecting to a database, and checking SQL database status, as well as answer some popular related questions, including whether you can run a popular SQL Server Management Studio (SSMS) on macOS.
Nội Dung Chính
How to install and config Docker
Microsoft developed SQL Server for Windows, which means to run it on Mac, you’ll need an additional tool. Docker is just the software for the task as it provides an environment for your SQL Server to work in.
Here’s how to install Docker on your Mac.
-
Sign up to Docker and download the app for your Mac.
-
Find and open Docker.dmg in your Downloads.

-
Find Docker in Finder > Applications and open it. The app will need to install a helper, so your Mac will ask to confirm the action with your password.

Install SQL Server on Mac
Before you proceed with SQL Server installation with the help of Docker, allocate more memory to the app.
Click the Preferences wheel in the top right corner of Docker app window and go to Resources tab. Find the Memory slider and move the thumb from the default setting of 2 GB to 4 GB. Then click Apply & Restart.

Now you are ready to download, set up, and run SQL Server on Mac.
Start by opening Terminal in Finder > Applications > Utilities or through a Spotlight search.
Once you see the Terminal window, type in:
docker pull mcr.microsoft.com/mssql/server:2019-latest
Hit Enter to send the command and wait for the download to begin:

Once the download is complete, you need to launch your downloaded SQL Server image in Docker. To do that, use this command in Terminal:
docker run –name [type in your desired SQL Server name here] -e ‘ACCEPT_EULA=Y’ -e ‘SA_PASSWORD=[type in your password for your database]’ -e ‘MSSQL_PID=[type in your Docker membership type]’ -p 1433:1433 -d mcr.microsoft.com/mssql/server:2019-latest
Note that ACCEPT_EULA=Y in the above command means you are accepting end user license agreement for Docker.
Your password needs to be at least 8 characters long, include uppercase and lowercase letters, numbers, and symbols.
Here’s the command we used:
docker run –name SQLServer -e ‘ACCEPT_EULA=Y’ -e ‘SA_PASSWORD=12345OHdf%e’ -e ‘MSSQL_PID=Express’ -p 1433:1433 -d mcr.microsoft.com/mssql/server:2019-latest
SQL Server should be running on your machine now. To check, click the Docker icon in your menu bar and go to Dashboard.

Now, you need to download and install Azure Data Studio. This tool is the Mac equivalent for SQL Server Management Studio (SSMS).
Download Azure Data Studio from the official Microsoft website — just google “azure data studio” and the first result is usually the respective Microsoft webpage. Find the version of the tool for macOS and download.
Once the download is complete, drag and drop the Azure Data Studio icon from your Downloads folder to Applications in Finder.
Open the app and click New connection.

Since SQL Server is running on your own Mac, the server here is just localhost. User name is SA for system admin, and the password is the one you’ve entered in the Terminal command to run SQL Server with Docker. That’s 12345OHdf%e in our example.
How to check if SQL Server works properly
If you are able to connect to your running SQL Server in Azure Data Studio, SQL Server should be fully operational.
To test it out, get a sample database from Microsoft and run a few queries. We’ve used AdventureWorks2019.bak database that corresponds to our SQL Server version. Simply google “adventureworks database” and go to the respective Microsoft webpage to get the sample database. Make sure to select the database version that coincides with your SQL Server version, in our example it’s mcr.microsoft.com/mssql/server:2019-latest, so we used AdventureWorks2019.bak OLTP data file.

Download the database file and move it to a new system folder for Docker to be able to access.
If your downloaded AdventureWorks2019.bak is in Downloads folder, first move there in Terminal with cd Downloads/ command.
Then create a new directory for your database file with sudo docker exec -it SQLServer mkdir var/opt/mssql/backup command.
Next, move your database to the new directory with sudo docker cp AdventureWorks2019.bak SQLServer:var/opt/mssql/backup command.
Now, open Azure Data Studio and click Restore on your SQL server home page:

From there, select Backup file restoration type and navigate to var/opt/mssql/backup/AdventureWorks2019.bak:

Confirm your choice and click Restore. Now you are ready to test SQL database connection with a few test queries. To do that, just select your newly added sample database and click New Query.

Now that you’ve completed your SQL Server setup, it’s time to think about managing your databases.
SQLPro Studio is one of the tools we can recommend. The app excels at all the database management basics that you need — create tables, make custom queries, use autocomplete, and more with this handy tool. SQLPro Studio is a native Mac app and supports multiple database types, including MySQL, PostgreSQL, Microsoft SQL Server, and others.

TablePlus is another app that can help you manage SQL databases. This GUI tool will come in handy for your MySQL, Postgre, SQLite, and other databases. Lightweight and fast, it’s super easy to use and makes your databases work lightning fast. Navigate your connected databases, edit data rows or table structure, and more with TablePlus.

FAQ
Can you run SSMS on Mac?
No, SQL Server Management Studio only runs on Windows. For macOS, Microsoft recommends using Azure Data Studio.
How do I access an SQL Server database on Mac?
In order to work with SQL databases on Mac, you need to use a virtualization tool like Docker, pull an SQL server image and run it, and then connect it to your Mac with a helper tool. In this article we’ve demonstrated how to do that with Azure Data Studio, but you can also use other tools for the task. Run Azure Data Studio restore tool to add an existing database and check your SQL database connection with a few test queries.
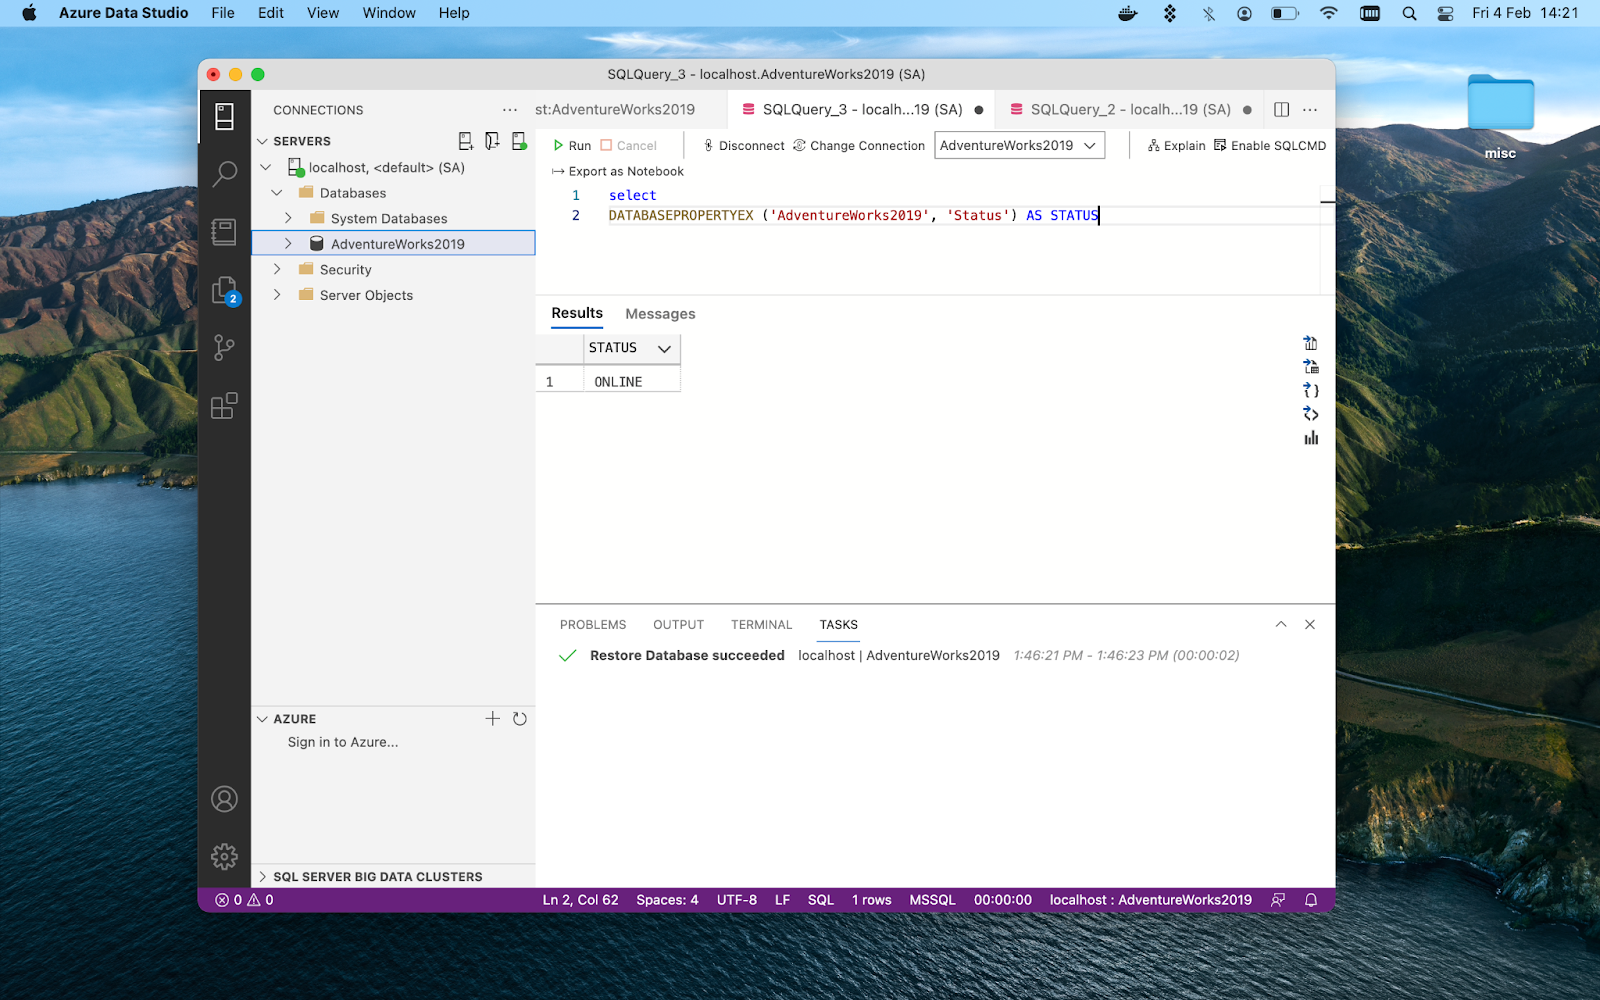
How do I check SQL database status?
To check your SQL database status, you can use DATABASEPROPERTYEX function:
How do I test an SQL database connection?
Run a test query as shown in the previous section of this blog post.
Conclusion
As you can see installing SQL Server on your Mac is quick and easy, although it requires a virtualization tool Docker. Since SSMS is not available for macOS, you’ll also need a replacement, which in our article was Azure Data Studio. The tool allows you to connect SQL Server engines to databases even on macOS.
We’ve also explained how to check database status and run basic queries in your connected databases.
To manage and edit your databases, you can use specialized tools like SQLPro Studio or TablePlus. Both are available with your Setapp subscription along with other tools for working with SQL databases, including SQLPro for SQLite and Base for SQLite.
Try these and more tools for daily productivity on Setapp. Start your 7-day free trial now!


