How to enable TPM 2.0 to install or upgrade Windows 11?
Microsoft published the new minimum hardware and software requirements for Windows 11, including the need for Trusted Platform Module (TPM) version 2.0. This article will outline a clear step-by-step guide for how to check and verify whether your device has the TPM 2.0 installed and operational. Furthermore, we will provide you the steps for how to enable secure boot and TPM 2.0 so that you can install or upgrade to Windows 11 smoothly.

Nội Dung Chính
Content Summary
How to check whether TPM enabled?
Use tpm.msc Management Console
Use Windows Security Settings UWP app
Use tpmtool Command
Use Get-Tpm PowerShell Command
How to check motherboard manufacturer, model, and BIOS version?
Use Windows Command Prompt (CMD)
Use Windows System Information utility
! Important points to note before enabling TPM 2.0
How to enable CPU-Based TPM 2.0 (Intel PTT & AMD fTPM)?
How to enable TPM 2.0 on Intel-powered motherboard?
How to enable TPM 2.0 on AMD-powered motherboard?
How to enable TPM 2.0 on Aptio Setup Utility?
How to enable TPM 2.0 for ASRock motherboard using ASRock UEFI Setup Utility?
How to enable TPM 2.0 for MSI motherboard using ClickBIOS?
How to enable TPM 2.0 for GIGABYTE motherboard using AORUS?
How to enable TPM 2.0 for the Asus motherboard using UEFI BIOS Utility?
How to enable TPM 2.0 for NZXT motherboard?
How to enable TPM 2.0 for Dell motherboard?
How to enable TPM 2.0 for Toshiba motherboard?
How to enable TPM 2.0 for the Intel motherboard?
Reference
How to check whether TPM enabled?
Use tpm.msc Management Console
Step 1: Press Windows + R key to open the Run box.
Step 2: Type tpm.msc and press Enter to open the Trust Platform Module (TPM) Management window. This will show you whether your device has the module installed and operational.
If the message Compatible TPM cannot be found show means that the TPM is disabled or you don’t have a TPM module on your motherboard. Proceed to the next section to find out the motherboard manufacturer, model, and BIOS version to prepare to enable the TPM.

If the Overview, Status The TPM is ready for use, Available Options and TPM Manufacturer Information are show mean you have a TPM module enabled and you are ready for the Windows 11 installation or upgrade.

Use Windows Security Settings UWP app
Step 1: Go to Start > Settings > Update & Security > Windows Security > Device security. Alternatively, you can open the Settings UWP app on the Device security tab by opening the URI windowsdefender://devicesecurity
Step 2: If the TPM 2.0 is enabled, you’ll see a link to the Security processor details page under Security processor.

Use tpmtool Command
Step 1: Click on the Start button and type cmd in the Search box.
Step 2: Click the Command Prompt in the search result.
Step 3: At the command prompt window, type or copy-paste the following command, and press Enter to execute it:
tpmtool.exe getdeviceinformation
This command will display the detailed status info of TPM.

Use Get-Tpm PowerShell Command
Step 1: Open an elevated PowerShell prompt.
Step 2: Type Get-Tpm, and press Enter to execute it.

How to check motherboard manufacturer, model, and BIOS version?
There are several ways to check motherboard manufacturer, model, and BIOS version from within Windows which work the same on PCs with traditional BIOS or newer UEFI firmware.
Use Windows Command Prompt (CMD)
You can display the motherboard model and BIOS information via the command prompt using the Windows Instrumentation Command-line (WMIC).
Step 1: Click on the Start button and type cmd in the Search box.
Step 2: Click the Command Prompt in the search result.
Step 3: At the command prompt window, type or copy-paste the following command, and press Enter to execute it:
wmic baseboard get product,manufacturer,version,serialnumber
This command will display the motherboard manufacturer, model number, version, and serial number if available.

wmic bios get smbiosbiosversion
This command will display the version number of the BIOS or UEFI firmware in the current PC.

Use Windows System Information utility
Step 1: Press Windows + R key to open the Run box.
Step 2: Type msinfo32 and press Enter to open the Windows System Information utility. Alternatively, you can find it at Start > All Programs > Accessories > System Tools > System Information utility.
Step 3: You’ll find the motherboard manufacturer, model, and BIOS version under the System Summary section.

! Important points to note before enabling TPM 2.0
- TPM 2.0 is ONLY supported in UEFI mode instead of Legacy and Compatibility Support Module (CSM) Modes of the BIOS. Devices with TPM 2.0 must have their BIOS mode configured as Native UEFI only. The Legacy and Compatibility Support Module (CSM) options must be disabled.
- BIOS update may be required because some motherboards might be lacking TPM-related BIOS settings.
- Switching from BIOS to UEFI mode may prevent the installed OS from booting. Use the MBR2GPT tool before changing the BIOS mode, preparing the OS and the disk to support UEFI.
- For added security Enable the Secure Boot feature.
How to enable CPU-Based TPM 2.0 (Intel PTT & AMD fTPM)?
All Intel CPUs have an embedded TPM 2.0 that Intel calls Platform Trust Technology (PTT) since Skylake (6th-generation Core). AMD CPUs have an embedded TPM 2.0 called Firmware Trusted Platform Module (fTPM) since the AM4 platform (2016). Check below links for the updated list of Windows 11 Supported Intel and AMD Processors:
To enable CPU-based TPM, you will need to boot into the UEFI mode to look for fTPM (AMD CPU) or PTT (Intel CPU) option, and enable it.
Note: Refer to below list of common BIOS keys by manufacturer brand. The BIOS key may be different depending on the age of the motherboard model.
- Acer and Aorusr: F2 or DEL
- ASUS: F2, F9, or F10 for all PCs, F2 or DEL for Motherboards
- Dell: F2 or F12
- HP: F10
- Lenovo (Consumer Laptops): F2 or Fn + F2
- Lenovo (Desktops): F1
- Lenovo (ThinkPads): Enter then F1.
- Microsoft Surface Tablets: Press and hold the volume up button.
- ASRock, Toshiba, Samsung, and Origin PC: F2
- Biostar, EVGA, Gigabyte, ECS, Zotac, and MSI: Del
How to enable TPM 2.0 on Intel-powered motherboard?
Step 1: Shut down the PC.
Step 2: Turn on the PC and press the BIOS key (DELETE/F1/F2/F10/F12 which differs according to motherboard manufacturer, refer to the above list) to enter the BIOS setup. Alternatively, you can access BIOS or Boot Menu using Windows 10 Recovery Advanced Startup.
Step 3: Navigate to the Settings tab and Miscellaneous menu option.
Step 4: Locate the PTT (Intel Platform Trust Technology) option, and change the setting to Enable.
Step 5: Press the F10 key to Save & Exit the BIOS.
Step 6: The PC should restart automatically and boot into Windows.
How to enable TPM 2.0 on AMD-powered motherboard?
Step 1: Shut down the PC.
Step 2: Turn on the PC and press the BIOS key (DELETE/F1/F2/F10/F12 which differs according to motherboard manufacturer, refer to the above list) to enter the BIOS setup. Alternatively, you can access BIOS or Boot Menu using Windows 10 Recovery Advanced Startup.
Step 3: Navigate to the Advanced tab.
Step 4: Locate the fTPM (Firmware Trusted Platform Module) option, and change the setting to Enable.
Step 5: Press the F10 key to Save & Exit the BIOS.
Step 6: The PC should restart automatically and boot into Windows.
How to enable TPM 2.0 on Aptio Setup Utility?
The TMP module is disabled in BIOS by default.

Step 1: Shut down the PC.
Step 2: Turn on the PC and press the BIOS key (DELETE or F2 which differs according to motherboard manufacturer, refer to the above list) to enter the BIOS setup. Alternatively, you can access BIOS or Boot Menu using Windows 10 Recovery Advanced Startup.
Step 3: Navigate to the Advanced tab > Trusted Computing option and press the Enter.

Step 4: Select Enable next to Security Device Support to enable TPM 2.0.
Step 5: Press the F10 key to Save & Exit the BIOS. The remainder of the TPM configuration options will become available after save and reboot, the default settings work well and need not be changed.

Step 6: The PC should restart automatically and boot into Windows.
How to enable TPM 2.0 for ASRock motherboard using ASRock UEFI Setup Utility?
Step 1: Shut down the PC.
Step 2: Turn on the PC and press the BIOS key (DELETE or F2 which differs according to motherboard manufacturer, refer to the above list) to enter the BIOS setup. Alternatively, you can access BIOS or Boot Menu using Windows 10 Recovery Advanced Startup.
Step 3: Navigate to Advanced tab > Trusted Computing.
Step 4: Click on the Security Device Support and select Enable.

Step 5: Press the F10 key to Save & Exit the BIOS.
How to enable TPM 2.0 for MSI motherboard using ClickBIOS?
Step 1: Shut down the PC.
Step 2: Turn on the PC and press the BIOS key (DELETE or F2 which differs according to motherboard manufacturer, refer to the above list) to enter the BIOS setup. Alternatively, you can access BIOS or Boot Menu using Windows 10 Recovery Advanced Startup.
Step 3: Navigate to Security > Trusted Computing.
Step 4: Click on the Security Device Support and select Enable.
Step 5: For the AMD processor, make sure that the AMD fTPM Switch option is enabled; For the Intel processor, make sure the Intel Platform Trust Technology option is enabled.

Step 6: Navigate to Advanced > Windows OS Configuration >Secure Boot.
Step 7: Click on the Secure Boot Mode and choose Custom. If a warning about the security code appears, click Yes.
Step 8: Click the Enter all factory default keys to generate the secure boot keys.
Step 9: Click on the Secure Boot and choose Enabled.

Step 10: Go to Save and Exit and click on the Save Changes and Restart option to save all the changes made.
How to enable TPM 2.0 for GIGABYTE motherboard using AORUS?
Step 1: Shut down the PC.
Step 2: Turn on the PC and press the BIOS key (DELETE or F2 which differs according to motherboard manufacturer, refer to the above list) to enter the BIOS setup. Alternatively, you can access BIOS or Boot Menu using Windows 10 Recovery Advanced Startup.
Step 3: The Easy Mode will show on the first screen, press F2 inside the BIOS or click on the Advanced Mode option in the sidebar to switch to Advanced mode.

Step 4: Navigate to the Settings tab and double-click on the Miscellaneous option.

Step 5: For the Intel processor, locate Intel Platform Trust Technology (PTT) option and select Enable from the drop-down menu. For the AMD processor, locate the AMD CPU fTPM option and select Enable from the drop-down menu.


Step 6: Navigate to the Boot tab and double-click on the Secure Boot option.

Step 7: Click the Secure boot option and change it to Enabled.

Step 8: Navigate to the BIOS tab, click the CSM Support option and change it to Disabled.

Step 9: Navigate to the Save & Exit tab, click the Save & Exit option and restart the PC.
How to enable TPM 2.0 for the Asus motherboard using UEFI BIOS Utility?
Step 1: Shut down the PC.
Step 2: Turn on the PC and press the BIOS key (DELETE or F2 which differs according to motherboard manufacturer, refer to the above list) to enter the BIOS setup. Alternatively, you can access BIOS or Boot Menu using Windows 10 Recovery Advanced Startup.
Step 3: The EZ Mode will show on the first screen, press F7 inside the BIOS to switch to Advanced Mode.
Step 4: Click on the Advanced tab > Trusted Computing.

Step 5: Set the Security Device Support and TPM State option to Enabled.

Step 6: Press the F10 key to Save & Exit the BIOS.
How to enable TPM 2.0 for NZXT motherboard?
Step 1: Shut down the PC.
Step 2: Turn on the PC and press the BIOS key (DELETE or F2 which differs according to motherboard manufacturer, refer to the above list) to enter the BIOS setup. Alternatively, you can access BIOS or Boot Menu using Windows 10 Recovery Advanced Startup.
Step 3: Navigate to Advanced tab > Trusted Computing.
Step 4: Click on the Security Device Support and select Enable.

Step 5: Press the F10 key to Save & Exit the BIOS.
How to enable TPM 2.0 for Dell motherboard?
Step 1: Shut down the PC.
Step 2: Turn on the PC and press the F2 key to enter the BIOS setup. Alternatively, you can access BIOS or Boot Menu using Windows 10 Recovery Advanced Startup.
Step 3: From System Setup Main Menu, navigate to System BIOS > System Security.
Step 4: Set the TPM Security option to On.

Step 5: Click the Exit link located at the top right corner, and then click Yes to save the settings on exit.
How to enable TPM 2.0 for Toshiba motherboard?
Step 1: Enter the ACPI BIOS System Setup screen.
Step 2: Enable the TPM setting in the Security Controller section.
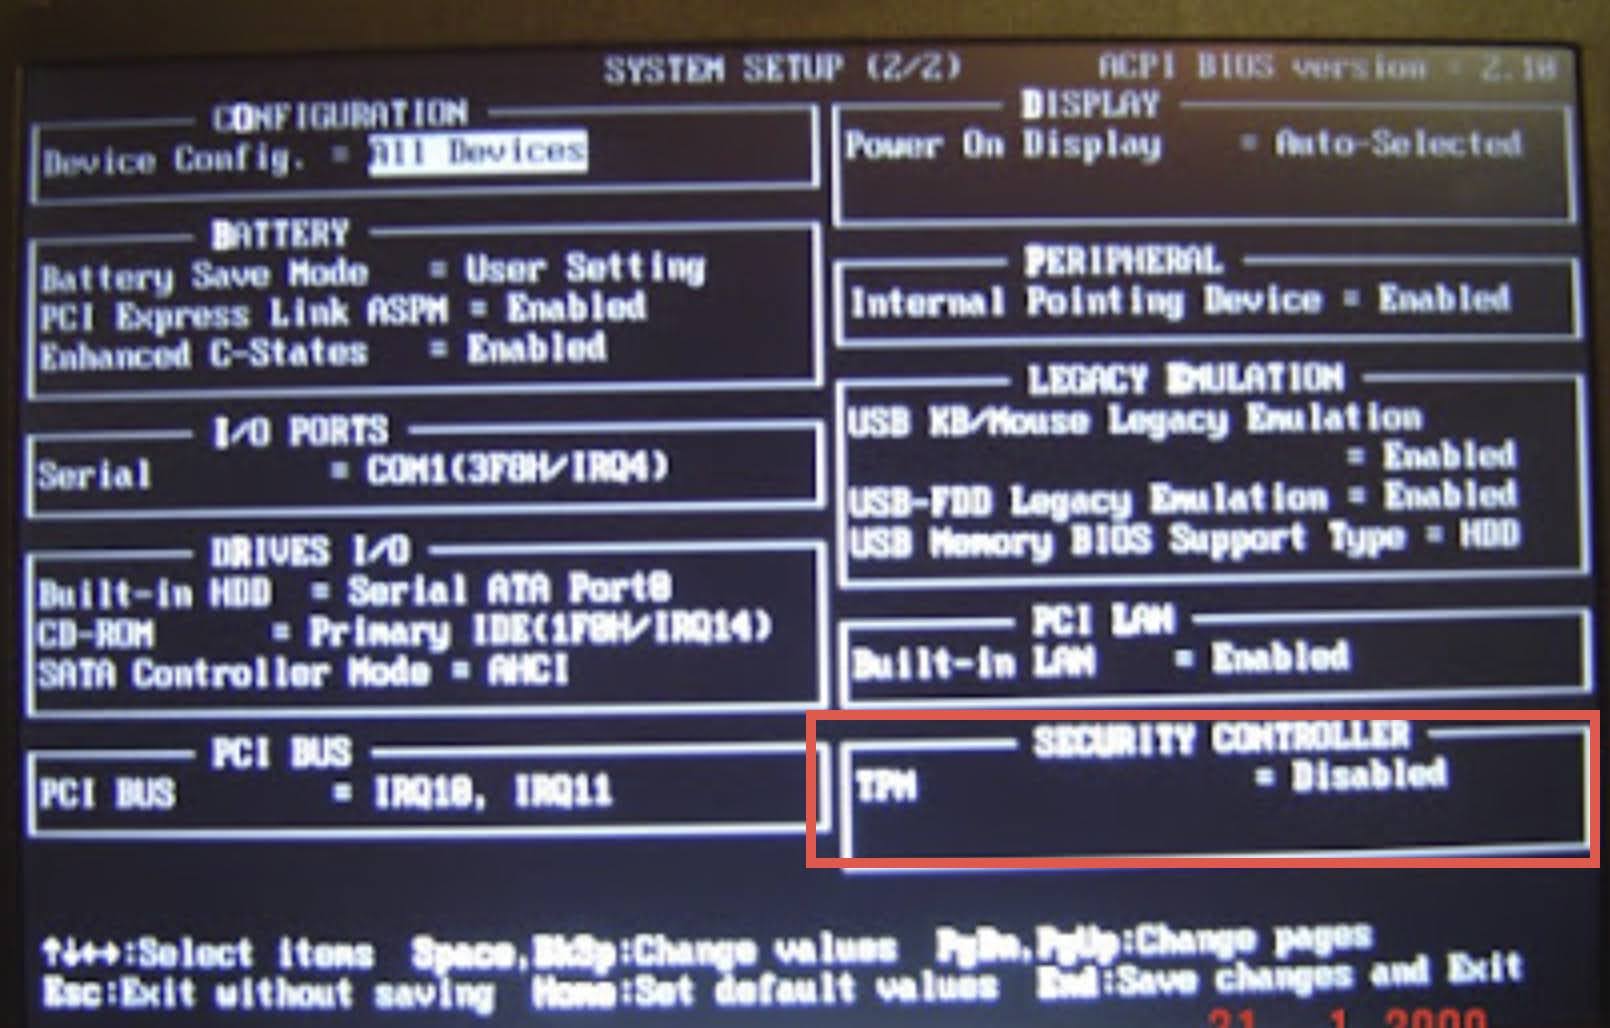
Step 3: Press the End key to Save changes and Exit.
How to enable TPM 2.0 for the Intel motherboard?
Step 1: Shut down the PC.
Step 2: Turn on the PC and press the F12 key to enter the BIOS setup. Alternatively, you can access BIOS or Boot Menu using Windows 10 Recovery Advanced Startup.
Step 3: Navigate to BIOS > Boot maintenance Manager > Advanced Boot options > Boot Mode.
Step 4: Select UEFI for Boot Mode.

Step 5: Press the F10 key and Y to proceed to Save & Exit.
Step 6: After restart, boot into BIOS again.
Step 7: Navigate to the Security tab and set the Administrator Password.
Step 8: Press the F10 key and Y to proceed to Save & Exit.
Step 9: After restart, boot into BIOS again.
Step 10: Navigate to the Security tab and press Enter on the TPM2 Operation option.
Step 11: Select the Clear TPM2 ClearControl (NO) + Clear option and press Enter.

Step 12: Press the F10 key and Y to proceed to Save & Exit.

Step 13: After restart, boot into BIOS again.
Step 14: Navigate to the Advanced > Integrated IO configuration menu.
Step 15: Select the Intel (R) VT for Directional I/O option and press Enter.
Step 16: Select the Enabled option and press Enter.

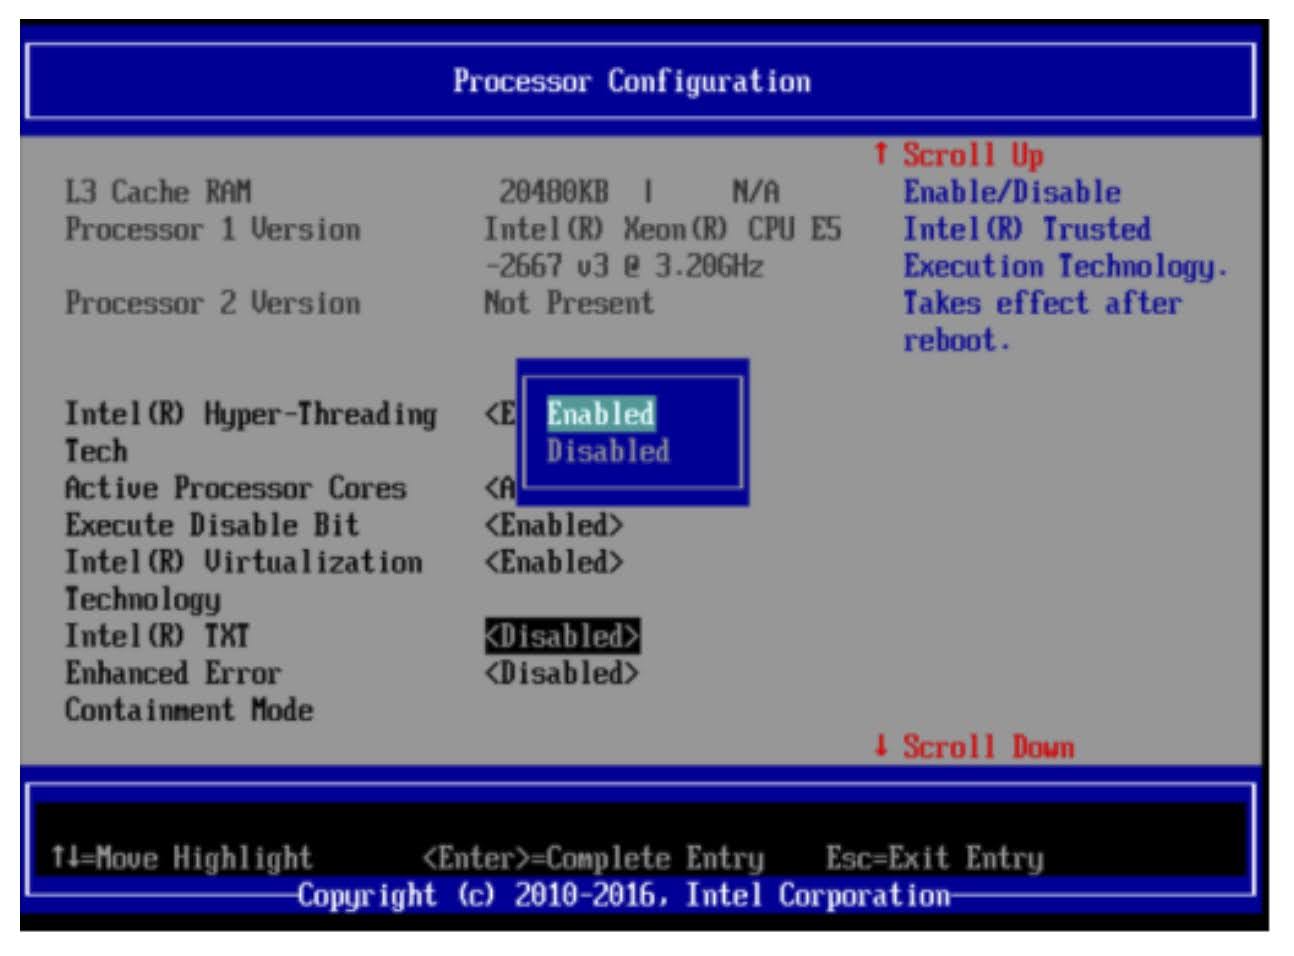
Step 17: Navigate to the Advanced > Processor Configuration menu.
Step 18: Select the Intel (R) Virtualization Technology option and press Enter.
Step 19: Select the Enabled option and press Enter.

Step 20: Press the F10 key and Y to proceed to Save & Exit.
Step 21: After restart, boot into BIOS again.
Step 22: Navigate to the Advanced > Processor Configuration menu.
Step 23: Select the Intel (R) TXT option and press Enter.
Step 24: Select the Enabled option and press Enter.
Step 25: Press the F10 key and Y to proceed to Save & Exit.


