ESP8266 Programming with Arduino | ESP8266 AT Commands
Introduction
Hey techies, welcome back to Techatronic. In this article, we are going to teach you how you can add wifi to Arduino and ESP266 programming. So for this, we are using an ESP 8266 module. You have to provide the SSID and password of your hotspot network in the code so that Arduino can connect to the internet. There is an API key that you can find on the website, copy it, and paste it into the code. Other than that do not change anything in the code. You can also check out our articles on IoT and basic electronics. Just make the connections according to the given circuit diagram and then upload the code. So let us start the procedure.
HTML Image as link

Description
- In this tutorial, we are sending the data to a cloud storage platform using ESP8266 programming.
- For sending the data over the internet we are using an ESP 8266 wifi module.
- This module is helpful for establishing a connection between a web server and Arduino UNO.
- We are sending the data to Thinkspeak, which is an open IoT cloud platform.

- The Arduino will send some random numbers to the server but you can modify them as per your need.
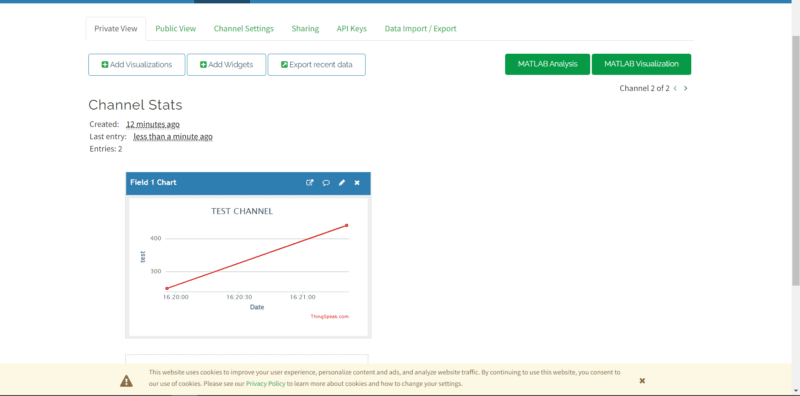
- The collected data is visible on the web page in the form of a line graph and it refreshes automatically.
- You can also check the smart IoT farming project made by us.
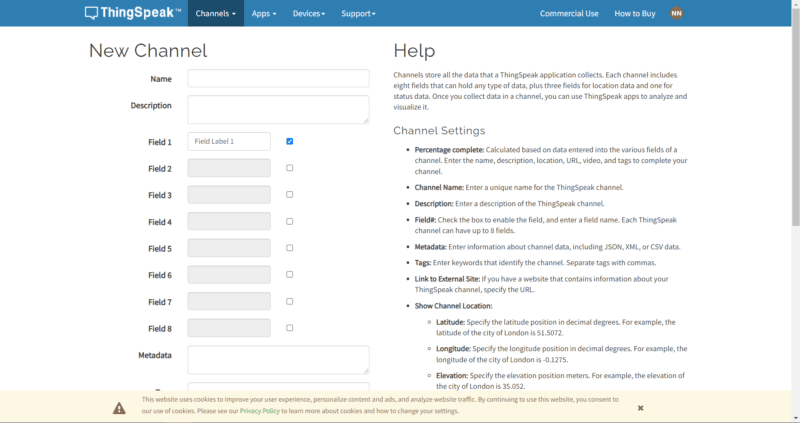
First of all, open the web page of thingspeak and click on free excess. Then create a new channel by providing a suitable name and information where all the things operated with the at command in esp8266.

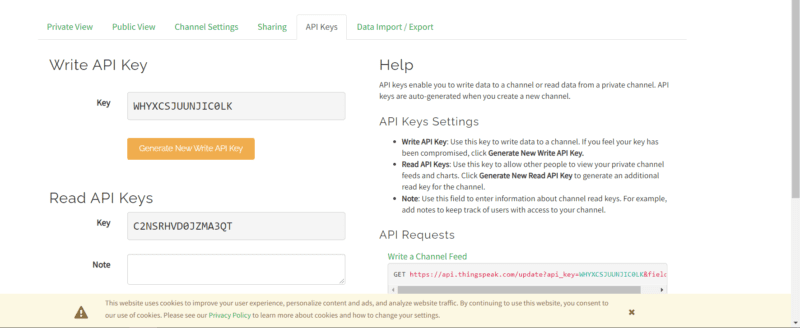
After that click on the save channel and open the API Keys section. Copy the write API key from the page, you can also change it if necessary.
Your channel is created successfully.
HTML Image as link


Components Required
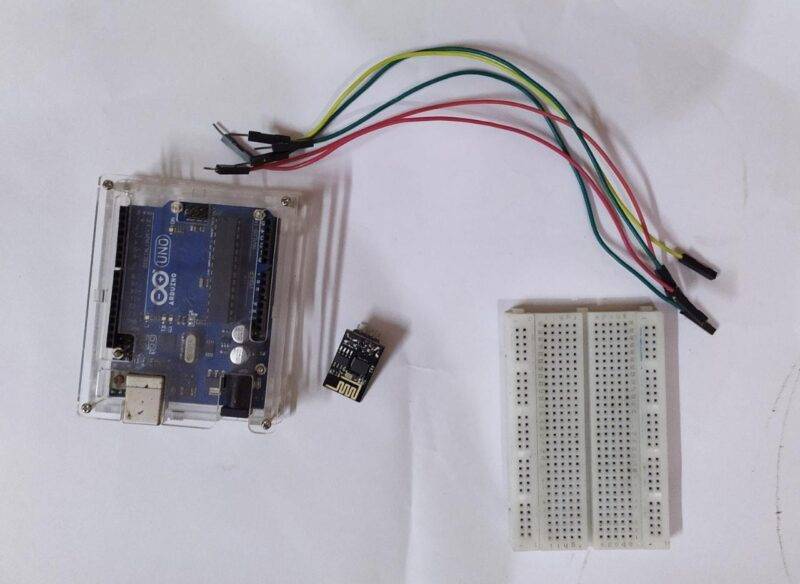
- Arduino UNO
- ESP 8266 wifi module
- Jumper wires and a breadboard
- USB cable for uploading the code
Circuit For NodeMcu programming using Arduino
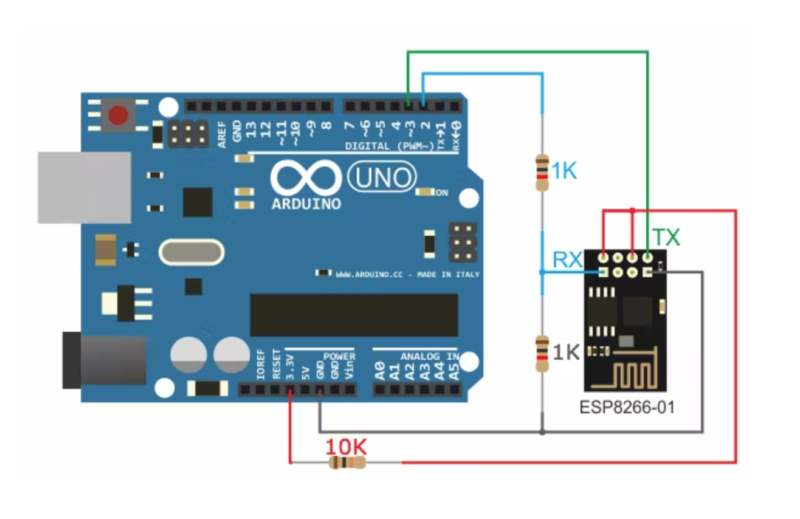
There are two GPIO pins in the ESP 8266 wifi module.
Connect the GND pin of the module with the GND pin of the Arduino.
Join the Tx pin with the digital-2 pin of the Arduino.
You can search for the pin diagram of the ESP 8266 wifi module so that you can remember the pins.
Connect the CH_EN pin of the module with the 5 volts pin of the Arduino.
Join the Rx pin with the digital-3 pin of the Arduino.
At last, connect the VCC pin of the module with the 5 volts pin of the Arduino.
You can use a breadboard for making the connections.
Your circuit is ready to use, now let us proceed to the code section.
Code For ESP 8266 programming using Serial communication
NOTE: Please upload this code to the Arduino UNO. You have to install <SoftwareSerial.h> library first. If you don’t know how to install a zip library to the Arduino IDE then check it out first.
#include <SoftwareSerial.h>
#define RX 2
#define TX 3
String AP = "xxxxxxxxxxx";       // AP NAME
String PASS = "xxxxxxxxxx"; // AP PASSWORD
String API = "xxxxxxxxxxxxxxxx";   // Write API KEY
String HOST = "api.thingspeak.com";
String PORT = "80";
String field = "field1";
int countTrueCommand;
int countTimeCommand;
boolean found = false;
int valSensor = 1;
SoftwareSerial esp8266(RX,TX);


void setup() {
  Serial.begin(9600);
  esp8266.begin(115200);
  sendCommand("AT",5,"OK");
  sendCommand("AT+CWMODE=1",5,"OK");
  sendCommand("AT+CWJAP=\""+ AP +"\",\""+ PASS +"\"",20,"OK");
}

void loop() {
 valSensor = getSensorData();
 String getData = "GET /update?api_key="+ API +"&"+ field +"="+String(valSensor);
sendCommand("AT+CIPMUX=1",5,"OK");
 sendCommand("AT+CIPSTART=0,\"TCP\",\""+ HOST +"\","+ PORT,15,"OK");
 sendCommand("AT+CIPSEND=0," +String(getData.length()+4),4,">");
 esp8266.println(getData);delay(1500);countTrueCommand++;
 sendCommand("AT+CIPCLOSE=0",5,"OK");
}

int getSensorData(){
  return random(1000); // Replace with your own sensor code
}

void sendCommand(String command, int maxTime, char readReplay[]) {
  Serial.print(countTrueCommand);
  Serial.print(". at command => ");
  Serial.print(command);
  Serial.print(" ");
  while(countTimeCommand < (maxTime*1))
  {
    esp8266.println(command);//at+cipsend
    if(esp8266.find(readReplay))//ok
    {
      found = true;
      break;
    }

    countTimeCommand++;
  }

  if(found == true)
  {
    Serial.println("OYI");
    countTrueCommand++;
    countTimeCommand = 0;
  }

  if(found == false)
  {
    Serial.println("Fail");
    countTrueCommand = 0;
    countTimeCommand = 0;
  }

  found = false;
 }
We hope that you like this project and understand it as well. If you have any doubts regarding this post then do let us know in the comments section given below. Also, check out our projects on Arduino and Raspberry Pi.
Happy Learning!
Spread the love


